
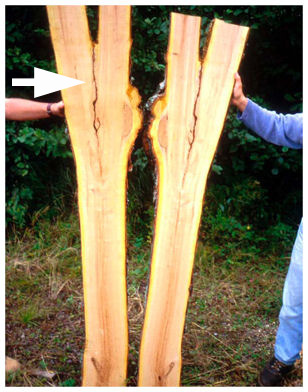
The dissection to the left are codominant leaders. Notice the included bark down the middle (White arrow). A point worth mentioning is the the included bark formed when the tree was younger. When the bark was formed it was on the outside of the stems and not included.
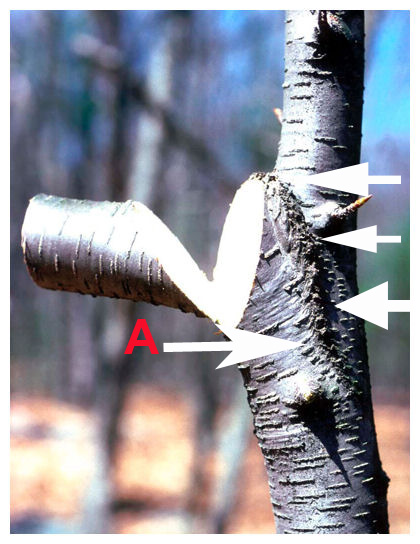
To the left, is one proper pruning cut, for a young stem with codominant leaders. The white arrows on right are the Branch Bark Ridge (BBR) - the raised area. It may be best to call the bark ridge of codominant stems the stem bark ridge if there is no branch collar. Do not place the saw on or behind the BBR. If you follow the BBR to the bottom and go straight out, that is your target for pruning at bottom of cut. (White arrow A). The time to prune these is when the stem is young before included bark develops.
Included Bark and the Branch Bark Ridge
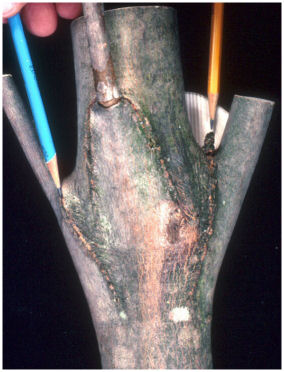 The yellow pencil
on the right points to the raised branch bark ridge (BBR). This is a good
union at this time. The blue pencil on the left points to the spot where
the branch bark ridge turns inward and included bark developed.
The yellow pencil
on the right points to the raised branch bark ridge (BBR). This is a good
union at this time. The blue pencil on the left points to the spot where
the branch bark ridge turns inward and included bark developed.
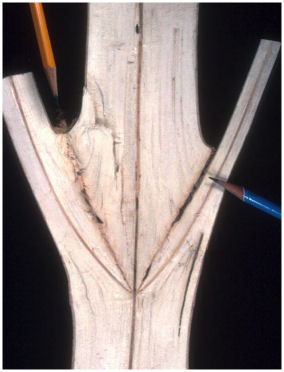
This is the same sample as above. The blue pencil points to the included bark which is a part of the week union associated with the codominant stem. The yellow pencil points to the good union where there is no included bark.
Proper Pruning of Codominant Stems
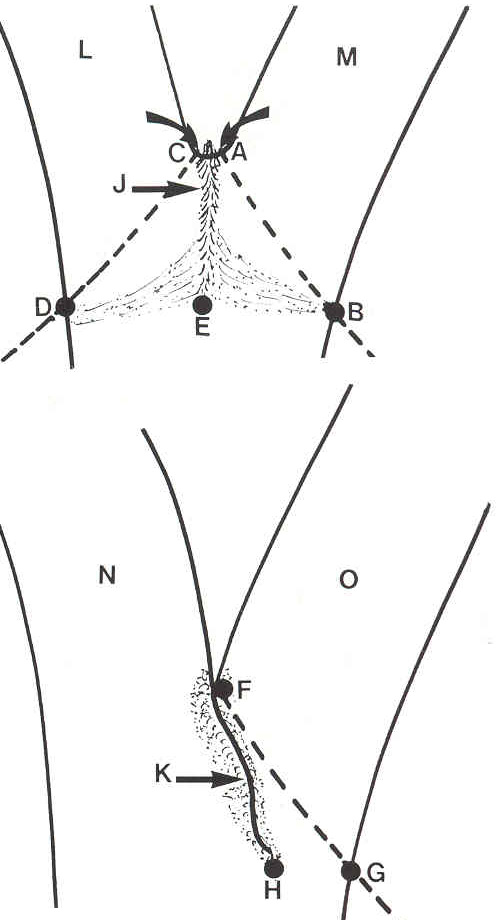
1. To remove stem L, cut from C to D or from D to C with
care. To remove stem M, cut from A to B or from B to A with care.
Always stub cut the stem to be removed , and then make the
final cut with care.
Points D and B are opposite point E.
Point E is the beginning of the stem bark ridge (J).
Point C is to the left of the stem bark ridge and point A is
to the right of the stem bark ridge.
Never remove both stems.
2. When the bark plates on the stem bark ridge turn upward as
shown in figure 1, the union of the stem is strong. When the bark between
the stems turns inward as shown by K in figure 2, then union of the stem is
weak. It is the union of the stems more than the angle that determines
whether a stem is weak or strong. Strong unions usually have a U-shaped
crotch.
In figure 2, stem N is beginning to envelop stem O. The
stems have bark between them at position K.
The bark between the stems is called
included bark.
There are three ways to
remedy this situation: remove O, prune living wood from O and not from N, or put
a a cable between N and O.
To remove O, stub cut the stem first and then cut from G to F with care.
Point G is opposite point H, which is the beginning of the stem bark ridge, or
the point where the bark begins to a turn inward.
To slow the growth of O, remove approximately a third of the
living branches. Do not prune stem N. Stem N will begin to form a
trunk collar about stem O. This can be done only on young trees.
To extend the safe period of stem O on older trees, a cable
can be attached by professionals. The cable should be placed at a point
approximately two-thirds of the distance from the crotch to the top of the tree.
Proper placement of cables requires a great amount of skill.
When a cable is used to extend the safe period of stems. the cable must be
checked regularly. When the risk of stem fracture becomes high, the stem
should be removed by professionals.
Source "Tree Pruning"